学习 visual studio code
安装与编译
下载源码
1 git clone https://github.com/microsoft/vscode
安装环境
1
2
3
4
cd vscodeyarn npm install --global --production windows-build-tools --vs2015
运行
1
2
3
4
5
6
7
8
9
yarn watch .\scripts\code.bat ./scripts/code.sh
目录结构
1
2
3
4
5
6
7
8
9
10
11
12
13
14
15
16
17
18
19
20
21
22
23
24
E:/vscode ├── azure-pipelines.yml // ci ├── build // build stript ├── cglicenses.json // licence ├── cgmanifest.json ├── CONTRIBUTING.md // 贡献说明 ├── extensions // vs 内置扩展 ├── gulpfile.js // gulp 脚本 ├── LICENSE.txt ├── node_modules ├── out // ts 编译输出 ├── package.json ├── product.json ├── README.md ├── remote ├── resources // 一些特定平台的资源 ├── scripts // 运行electron的脚本 和 一些测试运行脚本 ├── src // 源代码 ├── test // 测试 ├── ThirdPartyNotices.txt ├── tsfmt.json ├── tslint.json └── yarn.lock
VS code 如何更新
通过搜索关键字,可以定位到 src\vs\platform\update\electron-main\abstractUpdateService.ts , 然后会发现这是一个 TS 的 abstract class 同目录下还有 updateServeice.[平台名称].ts 说明具体更新是根据环境不同而基于抽象方法的具体执行,之后可以找到 updateIpc.ts 文件,在通过搜索这个文件名称,就可以找到 Code Application 文件 src\vs\code\electron-main\app.ts.
1 2 3 import { IUpdateService } from "vs/platform/update/common/update" ;import { UpdateChannel } from "vs/platform/update/electron-main/updateIpc" ;
1 2 3 4 5 6 7 8 9 10 11 12 13 14 15 16 17 18 19 20 21 22 23 24 25 26 private async createServices (machineId : string , trueMachineId : string | undefined , sharedProcess : SharedProcess , sharedProcessClient : Promise <Client <string >>): Promise <IInstantiationService > { const services = new ServiceCollection (); switch (process.platform ) { case 'win32' : services.set (IUpdateService , new SyncDescriptor (Win32UpdateService )); break ; case 'linux' : if (process.env .SNAP && process.env .SNAP_REVISION ) { services.set (IUpdateService , new SyncDescriptor (SnapUpdateService , [process.env .SNAP , process.env .SNAP_REVISION ])); } else { services.set (IUpdateService , new SyncDescriptor (LinuxUpdateService )); } break ; case 'darwin' : services.set (IUpdateService , new SyncDescriptor (DarwinUpdateService )); break ; } }
通过函数名称可以看到,这个函数被注册到 VS code 的服务中心, 并根据实际平台来注册了对应的方法。
1 2 3 4 5 6 7 8 9 10 11 12 13 14 15 16 17 18 19 private openFirstWindow (accessor : ServicesAccessor , electronIpcServer : ElectronIPCServer , sharedProcessClient : Promise <Client <string >>): ICodeWindow [] { const launchMainService = accessor.get (ILaunchMainService ); const launchChannel = createChannelReceiver (launchMainService, { disableMarshalling : true }); this .mainIpcServer .registerChannel ('launch' , launchChannel); const updateService = accessor.get (IUpdateService ); const updateChannel = new UpdateChannel (updateService); electronIpcServer.registerChannel ('update' , updateChannel); const issueService = accessor.get (IIssueService ); const issueChannel = createChannelReceiver (issueService); electronIpcServer.registerChannel ('issue' , issueChannel); }
通过函数名可以得知这是在窗口首次建立的时候所运行的方法(有个好名字真好),函数内注册了一些 IPC (Inter-Process Communication, 进程通信 主进程和渲染进程通信)方法。
createServices 方法会在 openFirstWindow 方法之前被调用, openFirstWindow 方法内通过 accessor.get(IUpdateService) 获得了 createServices 内注册的方法,然后在通过 electronIpcServer 注册在 渲染进程
那么核心代码就是 src\vs\platform\update 这个模块了
UpdateService 实例化
在app.ts 创建 updateChannel
通过在 createServices 函数内注册
1 services.set (IUpdateService , new SyncDescriptor (Win32UpdateService ));
之后再 openFirstWindow 函数内
1 2 3 4 5 6 7 8 9 10 11 const updateService = accessor.get (IUpdateService );const updateChannel = new UpdateChannel (updateService);electronIpcServer.registerChannel ("update" , updateChannel);
UpdateChannel 内部听了两个方法 listen call 分别是订阅和通知, 让使用变得更加简单.
1
2
3
4
5
6
7
8
9
10
11
12
13
14
15
16
17
18
19
20
21
22
23
24
25
26
export class UpdateChannel implements IServerChannel { constructor (private service : IUpdateService listen (_ : unknown , event : string ): Event <any > { switch (event) { case 'onStateChange' : return this .service . ; } throw new Error (`Event not found: ${event} ` ); } call (_ : unknown , command : string , arg ?: any ): Promise <any > { switch (command) { case 'checkForUpdates' : return this .service .checkForUpdates (arg); case 'downloadUpdate' : return this .service .downloadUpdate (); case 'applyUpdate' : return this .service .applyUpdate (); case 'quitAndInstall' : return this .service .quitAndInstall (); case '_getInitialState' : return Promise .resolve (this .service .state ); case 'isLatestVersion' : return this .service .isLatestVersion (); } throw new Error (`Call not found: ${command} ` ); } }
UpdateChannel 类作为一个通用接口,在实例化的时候接受的参数,是具体执行方法。而具体的执行方法,会根据平台不同传入不同的参数。
AbstractUpdateService
从名字上来看,这是一个 abstract 类,在 TS 中 abstract 类不允许直接 new 得到实例, 而是需要通过继承,这个函数定义 IUpdateService 接口所列出的方法,并定义了一些 abstract 方法需要子类实现。
update.ts
AbstractUpdateService 类继承了 IUpdateService 接口,这个接口描述了 AbstractUpdateService 需要实现的方法,也是外部调用所调用的方法。
1
2
3
4
5
6
7
8
9
10
11
12
13
14
15
16
17
18
19
20
21
22
23
24
从上面的状态机运行上来看,更新在不同系统下行为也是不同的。
IUpdateService 是通过 createDecorator 函数来创建的一个函数
1 2 3 4 5 6 7 8 9 10 11 12 13 14 15 16 17 18 19 20 21 22 export function createDecorator<T>(serviceId : string ): ServiceIdentifier <T> { if (_util.serviceIds .has (serviceId)) { return _util.serviceIds .get (serviceId)!; } const id = <any >function (target : Function , key : string , index : number any { if (arguments .length !== 3 ) { throw new Error ( "@IServiceName-decorator can only be used to decorate a parameter" ); } storeServiceDependency (id, target, index, false ); }; id.toString = () => serviceId; _util.serviceIds .set (serviceId, id); return id; }
从代码中看到,它会返回一个函数,而且重写了toString方法
1 const id = <any >function (target : Function , key : string , index : number any
第三个参数是 index,那么说明这是一个参数装饰器.用来装饰函数参数或者构造函数参数的.
IUpdateService 接口是
1
2
3
4
5
6
7
8
9
10
11
12
13
export interface IUpdateService { _serviceBrand : undefined ; readonly onStateChange : Event <State >; readonly state : State ; checkForUpdates (context : any ): Promise <void >; downloadUpdate (): Promise <void >; applyUpdate (): Promise <void >; quitAndInstall (): Promise <void >; isLatestVersion (): Promise <boolean | undefined >; }
checkForUpdates
1
2
3
4
5
6
7
8
9
async checkForUpdates (context : any ): Promise <void > { this .logService .trace ('update#checkForUpdates, state = ' , this .state .type ); if (this .state .type !== StateType .Idle ) return this .doCheckForUpdates (context); }
这里这个 doCheckForUpdates 是一个 abstract 函数即需要子类继承的
win doCheckForUpdates
判断 url 是否存在,这个 url 是一个类似于:
1 https://update.code.visualstudio.com/api/update/win32-x64-user/stable/26076a4de974ead31f97692a0d32f90d735645c0
由下面这个函数生成,可以看到由平台,版本,commit 组成.
1
2
3
export function createUpdateURL (platform : string , quality : string string { return `${product.updateUrl} /api/update/${platform} /${quality} /${product.commit} ` ; }
请求这个 url,如果没有新版本就会返回一个 204 ,而且不包含 body,如果有新版本那么就会包含一个类似于下面这样的结果
1
2
3
4
5
6
7
8
9
10
{ "url" : "https://vscode.cdn.azure.cn/stable/26076a4de974ead31f97692a0d32f90d735645c0/VSCodeSetup-ia32-1.41.1.exe" , "name" : "1.41.1" , "version" : "26076a4de974ead31f97692a0d32f90d735645c0" , "productVersion" : "1.41.1" , "hash" : "089b1c71b884ef42a74e0dc0a5eb107eaa19d608" , "timestamp" : 1576680705440 , "sha256hash" : "d72dfa1e4644e0bbe7ebe7243a2ac59f51b2d2ca261bb24936f2879ad1d6aac3" , "supportsFastUpdate" : true }
修改当前状态为的 checking for updates
1 this .setState (State .CheckingForUpdates (context));
请求上面那个地址
1
2
3
4
5
6
7
8
9
this .requestService .request ({ url : this .url }, CancellationToken .None )`` 1. 如果没有更新修改状态值为 `Idle` 然后结束2. 这里还会根据程序目录有没有 `unins000.exe` 这个程序来决定是否进行下载3. 如果没有 `unins000.exe` 标记状态为 `available for download` 4. 如果有那么先清理系统中可能存在的临时文件,之后判断有本地有没有下载好的安装程序,有就终止下载,没有就下载安装包5. 下载完成之后会判断包是否支持快速更新,以及用户是否允许后台更新.如果都允许那么进行更新,并且会判断当前 product.target 的值是否为 user product.target 的值取决于安装包的版本,官网提供了 user 安装 system 安装6. 如果是 user 就调用 `doApplyUpdate` 函数进行更新否则修改状态值为 `downloaded`
doApplyUpdate
这个函数是 win 下才有的
判断状态不等于 downloaded 和 downloaded
判断本地安装包存在
然后调用 child_process.spawn 执行静默安装
安装完毕之后将状态修改为 Idle
linux doCheckForUpdates
和 win 一样
和 win 一样
请求更新地址
和 win 一样
如果有更新就将状态标记为 available for download
darwin(macOS)
修改状态为
downloadUpdate
1
2
3
4
5
6
7
8
async downloadUpdate (): Promise <void > { this .logService .trace ('update#downloadUpdate, state = ' , this .state .type ); if (this .state .type !== StateType .AvailableForDownload ) { return ; } await this .doDownloadUpdate (this .state ); }
这里会判断状态是否等于 AvailableForDownload 这个状态只在 Linux 下存在. 所以这是一个 Linux 下的更新方法
win doDownloadUpdate
在上面的 doCheckForUpdates 方法中,会判断程序所在目录是否存在 unins000.exe 如果不存在那么就将状态置为 AvailableForDownload
所以 win 的 doDownloadUpdate 方法很简单,就是直接调用浏览器打开下载链接.
1
2
3
4
5
6
7
protected async doDownloadUpdate (state : AvailableForDownload ): Promise <void > { if (state.update .url ) { shell.openExternal (state.update .url ); } this .setState (State .Idle (getUpdateType ())); }
linux doDownloadUpdate
也是打开链接下载安装包
1
2
3
4
5
6
7
8
9
10
11
12
protected async doDownloadUpdate (state : AvailableForDownload ): Promise <void > { if (product.downloadUrl && product.downloadUrl .length > 0 ) { shell.openExternal (product.downloadUrl ); } else if (state.update .url ) { shell.openExternal (state.update .url ); } this .setState (State .Idle (UpdateType .Archive )); }
darwin(macOS)
macOS 无此方法
applyUpdate
看代码会判断 状态 是否为 Downloaded , 这是一个 win 平台下更新的方法. 并且写了一个空的 doApplyUpdate 方法防止报错.
1
2
3
4
5
6
7
8
9
10
11
12
13
14
15
16
async applyUpdate (): Promise <void > { this .logService .trace ('update#applyUpdate, state = ' , this .state .type ); if (this .state .type !== StateType .Downloaded ) { return ; } await this .doApplyUpdate (); } protected async doApplyUpdate (): Promise <void > { }
win doApplyUpdate
doApplyUpdate 方法是 win 平台更新包的方法.主要做了以下事情:
判断当前状态是否为 Downloaded
判断 availableUpdate 是否为空 (doCheckForUpdates 方法会为其赋值)
之后想临时目录写入一个 CodeSetup-${quality}-${version}.flag 的一个文件,文件内容就是一个字符串flag
调用 child_process.spawn 执行安装包,进行静默安装, 并且添加启动参数, 安装参数区别于 下面的 doQuitAndInstall
坚挺 spawn 结束事件, 结束后做变量清理和状态设定为 Idle 工作
之后调用了 windows-mutex api 来判断,更新进程是否存在如果存在 while 循环 过 1 秒再看,如果更新进程不存在了设置状态值为 Ready
linux doApplyUpdate
linux 无此函数
darwin(macOS) doApplyUpdate
macOS 无此函数
quitAndInstall
这里会判断 状态 是否为 Ready
1
2
3
4
5
6
7
8
9
10
11
12
13
14
15
16
17
quitAndInstall (): Promise <void > { this .logService .trace ('update#quitAndInstall, state = ' , this .state .type ); if (this .state .type !== StateType .Ready ) { return Promise .resolve (undefined ); } this .logService .trace ('update#quitAndInstall(): before lifecycle quit()' ); this .lifecycleMainService .quit (true ).then (vetod => this .logService .trace (`update#quitAndInstall(): after lifecycle quit() with veto: ${vetod} ` ); if (vetod) { return ; } this .logService .trace ('update#quitAndInstall(): running raw#quitAndInstall()' ); this .doQuitAndInstall (); }); return Promise .resolve (undefined ); }
win doQuitAndInstall
判断状态是否符合
判断 doApplyUpdate 函数内创建的 flag 文件是否存在, 如果存在那么删除这个文件
如果这个 flag 文件不存在那么执行静默安装 这里静默安装的参数和 doApplyUpdate 不太相同
linux doQuitAndInstall
linux 无此函数
darwin(macOS)
electron 更新函数
1
2
3
4
5
protected doQuitAndInstall (): void { this .logService .trace ('update#quitAndInstall(): running raw#quitAndInstall()' ); electron.autoUpdater .quitAndInstall (); }
isLatestVersion
这个函数用来检查是否为最新版本就是一个请求判断响应值是否为 204,如果是那么就代表没有更新,反之则有
1
2
3
4
5
6
7
8
9
10
11
12
13
14
15
isLatestVersion (): Promise <boolean | undefined > { if (!this .url ) { return Promise .resolve (undefined ); } return this .requestService .request ({ url : this .url }, CancellationToken .None ).then (context => if (context.res .statusCode === 204 ) { return true ; } else { return false ; } }); }
vs code debugger extension
vs code debugger extension 文档
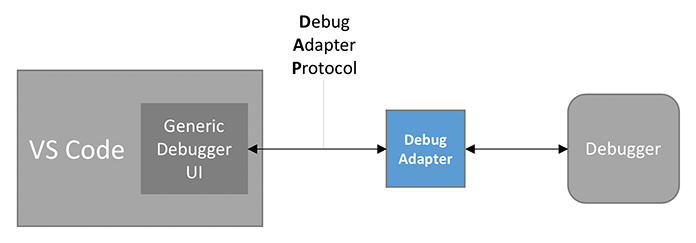
看文档 vs code 通过适配器进行 UI 和 Debugger 进行联动,下面是构架图。
这里调试界面是固定的,Debugger 是固定的,这里就使用了 Debug Adapter 简称 DA ,在 DA 和 vs code 之间的抽象协议为适配器协议(debug adapter Protocol), 适配器协议时独立于 VS code 的, 微软定义了一套规范 ,用于脱离具体环境(不耦合与 vs code),可以被用于其他开发工具中
vs code 提供了一套机制,用于控制调试器,当用户启动这个类型的调试会话时,vs code 就会启动一斤刚注册的 DA。
因此 debugger extension 就是适配器的包装